Clay pigeon throwers use a throwing arm powered by a heavy spring to catapult clay targets into the air. This heavy spring needs a substantial amount of force to cock. And when the arm is released, the recoil is enough to knock the machine.
So how can you address this issue without spending money on additional equipment? One effective solution is to mount your clay pigeon thrower to something heavy. And one of the best things you can tie down a pigeon thrower to is an old tire.
Attaching your pigeon thrower to an old tire will deal with the issue of recoil and make it easy for you to reposition the thrower if you need a change in the flight path. But how exactly do you go about fixing a pigeon thrower to an old used tire?
There are different ways of attaching a clay pigeon thrower to a tire for stability. One option is to use an angle iron frame, which ensures a solid connection between the thrower and the wheel. Another option is attaching a wooden base with the old tire and mounting the thrower. In this article, we will show you both methods and provide some tips on how to improve target shooting more effectively.
Here is a step-by-step guide on how to fix your pigeon thrower to an old used tire.
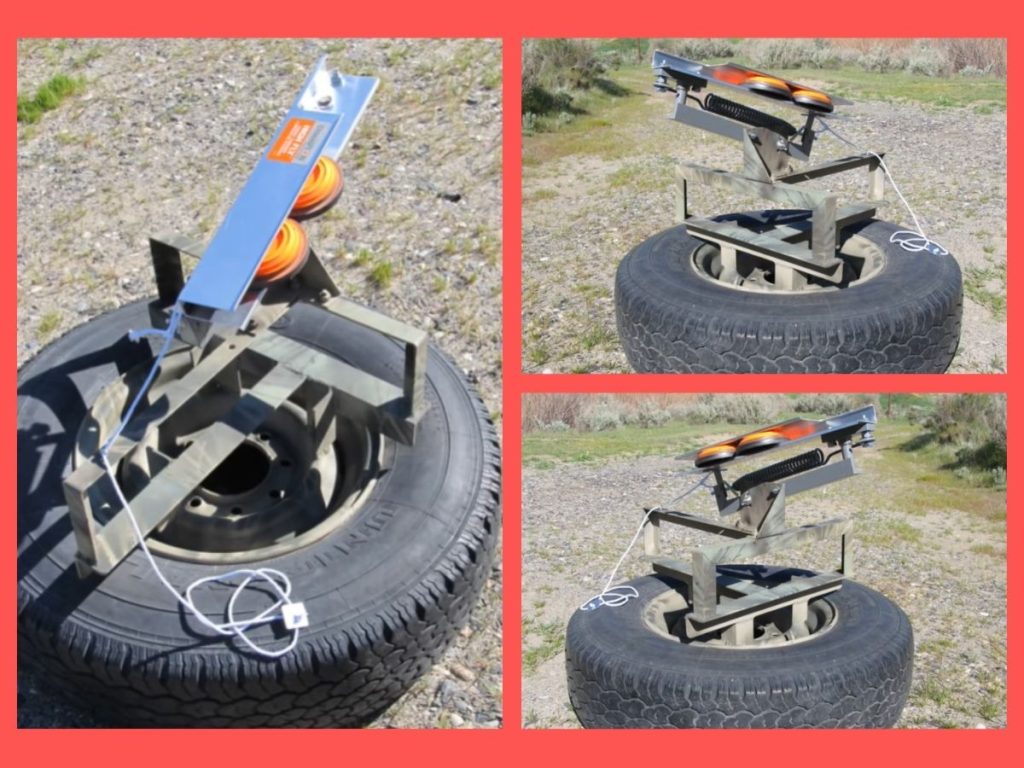
How To Attach and Mount Your Clay Pigeon/Skeet Thrower To A Tire Using Angle Iron Frame Base
You will need:
- 2″x2″x3/16″ angle iron frame
- used tire with steel wheel
- Welding gun or arc welder
- 1 each washer and nut -Drill
- Paint or camouflage
Step 1: Cut The Metal To Make The Frame
Draw or measure out a 2″x2″x3/16″ angle iron frame that will fit snugly around the steel wheel of your old tire. You may want to use a saw to cut the metal into smaller pieces so that it is easier to weld together later on.
Step 2: Create The Angle Frame
Make the angle frame by welding two pieces of angle iron together, making sure that the joints are smooth and flush. If you’re using a power welder, make sure to take precautions such as wearing eye protection and keeping your body away from the weld area. Once you have completed your frame, it is time to joint it with the steel wheel.
Step 3: Weld The Angle Frame With The Old Tire Steel Wheel
Weld the angle iron frame securely to the steel wheel using a welding gun or an arc welder. Be sure to use a high-quality weld and take your time to ensure that all surfaces of the angle iron frame and steel wheel are completely welded together.
Step 4: Preparing The Clay Pigeon Thrower To Attach
Once the angle iron frame is securely welded to the steel wheel, you can attach the clay pigeon thrower to the frame.
Step 5: Attaching The Clay Pigeon Thrower With The Angle Frame Base
Make drill holes in the clay pigeon thrower’s base and mount the angle iron frame using bolts or screws. Be sure to use a washer and nut on each side of the frame, as this will help ensure a solid connection between the frame and the clay pigeon thrower.
Step 6: Paint The Frame According To Your Thrower
Finally, paint or camouflage the frame to match your clay pigeon thrower’s color scheme.
Process Of How To Attach a Clay Pigeon Thrower To A Tire Using Wooden Base
What You Will Need
But first, let’s look at some of the things and tools you will need for the job.
- A used tire that you will attach the thrower to
- A 2×6 board that is 30 inches long
- A 30 inches long 2×4 board
- A drill, ⅜ inch, and ½ inch drill bits
- Four ½ by 3 inches bolts
- Four ½-inch nuts
- Eight ½-inch flat washers
- ⅜ by 3.5-inch carriage bolt
- ⅜ inch flat washer
- ⅜ inch nut
- 9/16 inch and ¾ inch wrenches
- Pencil
Step One: Drill Hole In The Board
The first step is to drill a hole in the 2×4 board. Ideally, you want the hole to be 15 inches from the end of the board. Next, drill another hole in the 2×6 board, which should also be 15 inches from the end of the board.
Step Two: Align The Board
Lay the two boards across each other so that they form a cross. The holes you drilled in both boards should be aligned.
Step Three: Join Board
Take the 3/8 by 3.5 carriage bolt and insert it into the hole you drilled in the 2×6 board and let it go down through the hole drilled on the 2×4 board. Next, put a flat washer through the threaded end of the carriage bolt and use the 9/16 inch wrench to tighten it.
Step Four: Make 2 Holes At The End Of The Boards
You will then have to drill another two holes, this time 1/2 inch holes. The holes should be centered on each board and should be 2 inches from each end of the board.
Step Five: Joint The Board With The Old Tire
Next, place the two boards on the used tire and drill down through the two 1/2 inch holes you drilled above. Drill through the holes and into the sidewalls of the used tire.
Step Six: Fastening The Bolts
Take the 1/2 by 3-inch bolts and use them to fasten the two boards onto the used tire. Use a flat washer on both the flat end and the threaded end of the bolt. Tighten the bolt securely using the ¾-inch wrench.
Step Seven: Place Your Pigeon Thrower On The Board
Take your pigeon thrower and position it on the 2×6 board. Position the thrower slightly ahead of where the 2×6 board intersects with the 2×4 board.
Step Eight: Find The Mounting Holes Underneath Of Your Pigeon Thrower
Depending on the type of thrower, you will find three or four mounting holes on its base. At this stage, take the pencil and mark the mounting holes’ position on the surface of the 2×6 board.
Step Nine: Fastening The Base Of The Thrower With The Board mounted on Top Of The Tire
Take a 3/8 inch drill bit and drill a hole through the marks you marked with a pencil in step seven. Next, take 3/8 by 2-inch bolts and fasten the thrower’s base to the 2×6 board. Put a flat washer on the bolt before attaching a nut.
Step Ten: Tighten the Nuts
Take the 9/16-inch wrench and tighten the nuts and bolts that you fixed in the above step.
Tips On Improving Your Target Shooting With A Clay Pigeon Thrower
Using a clay pigeon thrower will not instantly improve your shooting skills; after all, practice makes perfect. When using a pigeon thrower, there are some useful tips to note that will help improve your accuracy.
Pick A Gun With The Right Fit
Your accuracy will be affected if you do not pick the right gun for your target practice. Also, how you shoulder the shotgun will also influence your accuracy. To check if your gun is the right fit, put a target 16 yards away and take a few shots at it.
Do this without aiming; if the cluster of shots is not on-center, then you need to get your gun fitted properly.
Know Which Is Your Dominant Eye
When practicing with a clay pigeon thrower, it is important to know which is your dominant eye. It is easy to think that your right eye is dominant because you are right-handed. But this is not always the case.
While standing straight, point to something across from you to check your dominant eye and close your left eye. If the object is still visible, then your right eye is dominant. However, if you notice the object has moved, your left eye is dominant.
Keep The Gun Barrel Moving
When a target is fired from the thrower, keep the gun barrel moving and only stop when you are about to shoot. Also, keep your eye on the target at all times.
Focus On The Target
One rookie mistake most beginners make is to focus on the gun barrel. When taking a shot, you should focus on the target, not the barrel. Focusing on the target will cause you to miss and fire behind the target.
Conclusion
A clay pigeon thrower is a great mechanism for target practice especially aiming at moving targets. However, most portable throwers do not come fixed to anything, and using them on their own is never effective.
This is why you need to fix them to a heavy object. Old tires are commonly used for this purpose, and with the process outlined above, it is not difficult to attach a pigeon thrower to an old tire.

About The Author:
Lake Streeter, A Gun enthusiast, and loves to hunt in the middle of the wood. Always check the latest hunting gears out in the market and try to share his honest opinion with the audience in Hunting Nook.